
PhotoLesa's photography gear provided by:


 How many times has it happened to you? You find the perfect image for that newsletter, web site, brochure or what have you, and DANG, if only it were a little bit bigger! Arg. If the graphic had been created in Illustrator (an .eps, see NOTE below), enlarging it sans quality loss would be a snap. Alas, our beloved image is made of fragile little pixels (meaning it's a .jpg, .tif, or .gif) meaning we must use pixel-based image manipulation software such as Photoshop or Elements. Indeed, the Universe can be a cruel and harsh place.
NOTE: Graphics created in Illustrator are vector-based, which simply means that a complicated set of instructions is used to “describe” the image (these instructions are written in a language called Postscript). Photoshop and Elements are raster-based, meaning it uses actual dots (pixels) to make up an image.
However, surprisingly enough, both Photoshop and Elements can increase an image size in 10% increments without a huge loss in quality. In a pinch, this can be super useful. Be forewarned: with great power comes the need to practice great restraint! You may find yourself tempted to do *more* than 10% at a time. Resist that urge. Anything over 10% at a time leads to *major* quality degradation and that’s bad, mmmkay? Stick to 10% increments at a time, even if it means doing it 10 or more times to get the size you want.
Step 1: Open the coveted image and from the Image menu, choose Image Size.
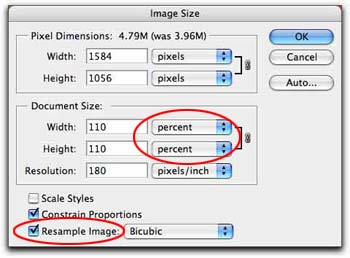
Step 2: Make sure that Resample Image is checked (circled in red below).
Step 3: Change the unit of measure pull down menu from inches to percent (also circled in red below), and type in 110.
Repeat steps 1-3 until you reach the desired image size.
That's all there is to it! I hope you enjoy this little emergency image fixer-uper :)


PhotoLesa's photography gear provided by: