
PhotoLesa's photography gear provided by:


Last week we began a tutorial on "revealing your inner Warhol", where we took a color photo, accentuated the shadow areas using the Burn tool, turned those areas solid black, and deleted the rest. This week we'll continue on with our Warhol creation and apply flat color shapes to the photo. One method of simulating this effect is to draw a selection with the Polygonal Lasso tool.
However, because we'll want to have the ability to change the color of these blocks later on, let us create each color block on its very own, private little layer.
Step 7: Command (PC: Ctrl) click the New Layer icon at the top left of the Layers Palette. This will add a new layer below the one currently selected.
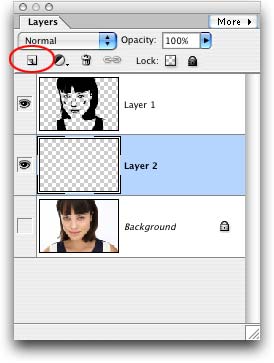
Step 8: Select the Polygonal Lasso tool and click once at the upper left portion of the face area. Draw an outline around the face by clicking to set another anchor point when you want to change directions. Don't worry about being precise; the point is, after all, to make it blocky. When finished, close the selection by hovering the cursor over the original anchor point. When a tiny circle (looks like a degree mark) appears next to the lasso tool, you've hit pay dirt. Click once to close up the selection.
Step 9: Click the foreground color chip in the main toolbox and pick a nice peachy color for her skin, then press OK. Fill the selection with color by pressing Option + Delete (PC: Alt + Delete). Press Command + D (PC: Ctrl + D) to deselect and get rid of the marching ants.
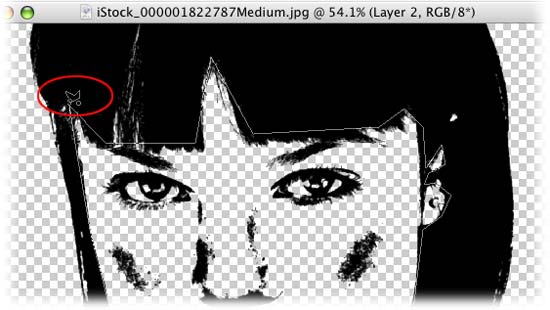
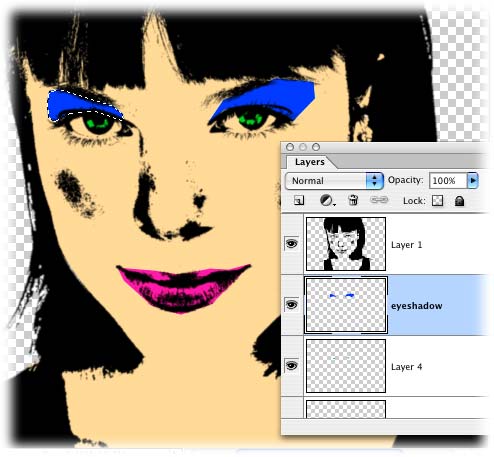
Step 10: Repeat this process on her lips. Add a new layer above the one we just filled with color by clicking the New Layer icon at the top left of the Layers Palette. Grab the Polygonal Lasso tool and draw a selection around the lip area. Remember, we want to make it blocky.
Step 11: Click the foreground color chip and choose a bright lip color. Fill the new layer with color by pressing Option + Delete (PC: Alt + Delete). Press Command + D (PC: Ctrl + D) to deselect and get rid of the marching ants.

Repeat this above process for each area you want to color. For example, create a selection around the iris of each eye (do this on one layer), then create another new layer and make a selection above her eyes to simulate eye shadow.
TIP: Place the iris color blocks on one layer since you'll most likely fill them with the same color. Same with the eye shadow blocks. This makes changing eye color and eye shadow color easier later on. You can also name each layer by double-clicking its label in the Layers Palette.
Step 12: When you're finished making color blocks (it's really quite fun!), create a new layer and drag it to the bottom of the layers stack, just above the original background layer. Fill it with a solid bright color. Say hello to your new background.
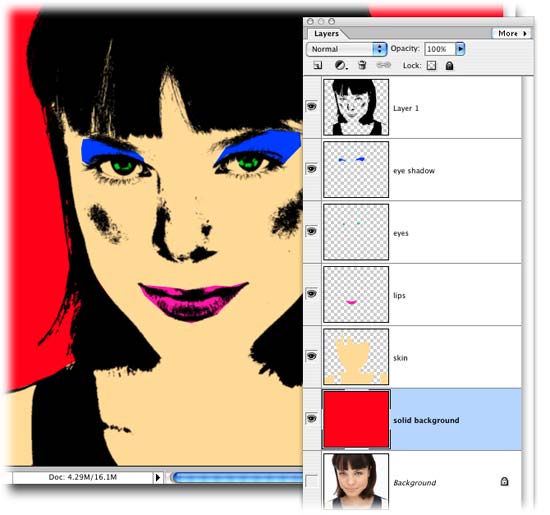
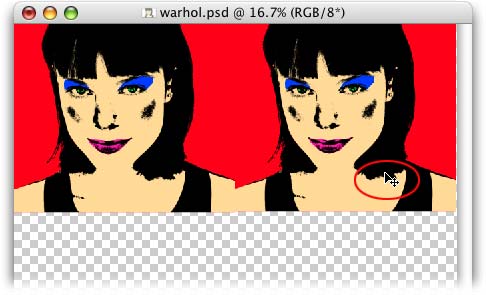
We now have exactly one image made. Only three more to go! To create the others, we'll duplicate the layers we just made, reposition them and apply new hues to the color blocks. But first, we need some room to work
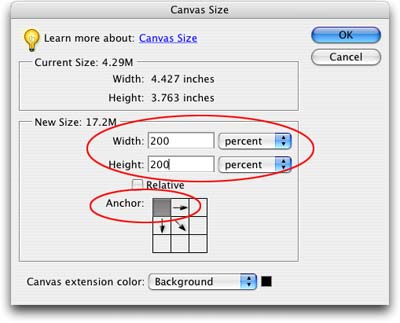
Step 13: Choose Image > Resize > Canvas Size. Select percent from the measurement pop-up menu, and enter 200 in both the height and width boxes. This will double the size of our working area. Click the top left box Anchor box to ensure the original image pops into the top left position and press OK.
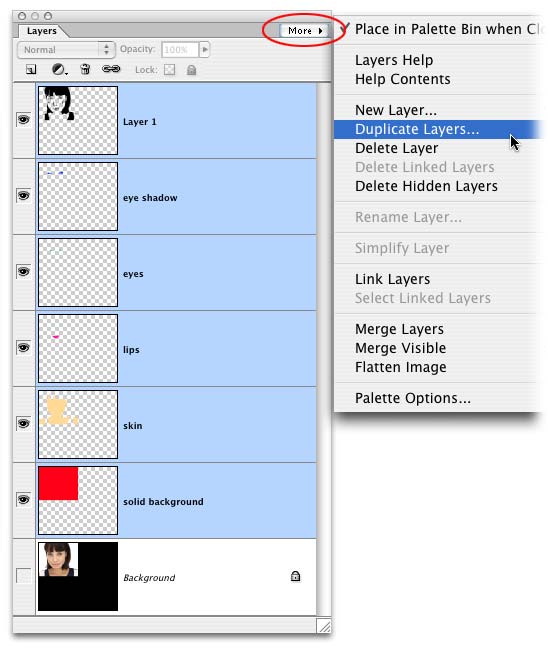
Step 14: Shift click to select all layers, save for the original Background layer (they'll all turn light blue). From the More menu at the top right of the Layers Palette, choose Duplicate Layers.
Step 15: With the duplicated layers selected, press V to select the Move tool and drag them to the right of the document.
TIP: Hold the Shift key while dragging to keep them perfectly straight.
Step 16: Command (PC: Ctrl) click the layer thumbnail of the solid background layer, circled in red below. (NOTE: If you click the name of the layer instead of its thumbnail, you won't get a selection.) As soon as the marching ants appear, click the foreground color chip in the main toolbox and pick another bright color. Press Option + Delete (PC: Alt + Delete) to fill the solid background copy layer with the new color. Press Command + D (PC: Ctrl + D) to deselect.
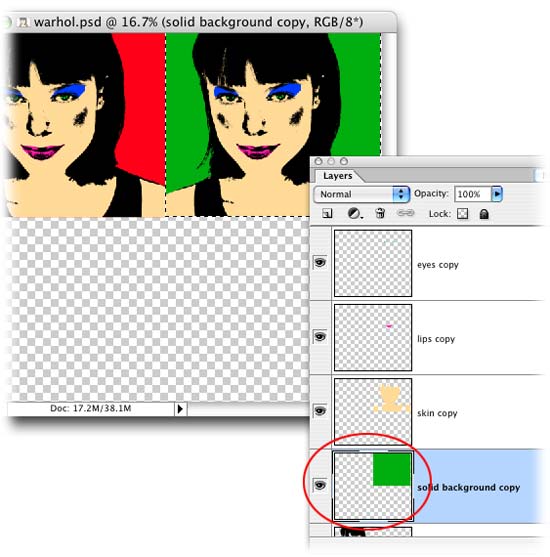
Repeat this re-colorization process for each copied color block layer.
Step 17: To create yet another image, Shift click each of the copied layers and again choose Duplicate Layers from the More menu at the top right of the Layers Palette. While the new duplicates are selected, press V to select the Move tool and drag them to the bottom left corner of the document.
Depending upon the number of images you want to place into your collage, you'll spend a fair amount of time duplicating layers and re-colorizing them, and you'll end up with a Layers Palette that's extremely long in the tooth.
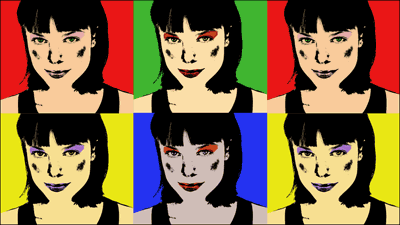
For a true Warhol reproduction, try creating two rows of three images and use the same image on either end of each row, as shown at the beginning of this article.
The really fun aspect of this technique is how personal it can be. Oh sure, you can seek out Warhol's art online and use the same color palette he did, but what fun would that be? Use your own vision and create something truly individual. With each color block on its own layer, you can tweak the colors 'til the cows come home. Also, try experimenting with photos of people with lighter hair colors. For example, if our model had been blonde, we could have colored her hair. If her shirt had been lighter, we could have color-blocked it too. The possibilities are endless!
Until next time, may the Elements force be with you all.


PhotoLesa's photography gear provided by: