
PhotoLesa's photography gear provided by:


What's the simplest way to highlight a certain portion of a photograph? Something that will really draw the viewer's eye to a given area?
As you can imagine, there are a gazillion answers to this question; however, today I'm going to share with you what I truly believe to be the quickest and easiest method: Make part of the photo color and the rest of it black and white. It's a really interesting photo effect, and you'll be amazed at how quick and easy this effect can be to create. Plus, this technique works exactly the same in Photoshop Elements.
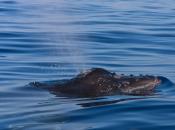
Step 1: Pop open a photo and press C to select the Crop tool. Draw a box around the subject matter of the image and press Return.

TIP: If you want to crop to a certain size and resolution, you can dial those numbers into the Options toolbar at the very top of your screen. Remember to include the unit of measurement on width and height, such as "600 px", else Photoshop thinks you mean inches.
Step 2: immediately trot down to the bottom of the Layers Palette and click the half black/half white circle to create an Adjustment Layer. Choose Hue/Saturation.

Step 3: In the resulting dialog box, drag the Saturation slider all the way to the left. This causes all color to drain from the photo. Click OK.

ADVANCED TIP: Better yet, use a Channel Mixer adjustment layer instead. Just click the Monochrome button in the resulting dialog to turn the image into grayscale and tweak the channel sliders for optimal contrast.
Lucky for us, all adjustment layers come with their very own layer mask. This will enable us to hide the effect of the adjustment layer in certain areas. In this case, it'll hide the act of converting the photo into a black and white image.
Step 4: With the layer mask still selected in the Layers Palette (you'll see a tiny hairline rule around it), press B to select the Brush tool.
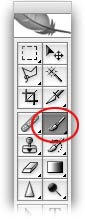
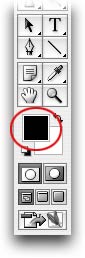
Step 5: In the realm of layer masks, painting with black hides and white reveals. Since we want to hide a bit of the adjustment layer, we'll need to paint with black. Take a peek at the color chips in the main Toolbar and press X until black sits happily on top.
Step 6: Mouse over to the photo itself and begin to paint the butterfly's wings. Notice how the color starts to show back through.

Step 7: Press the left bracket key, [, to cycle down in brush size to get its head and tail. Likewise, press the right bracket key, ], to cycle back up in brush size to fine tune the wing area.

TIP: Press Command + (PC: Ctrl plus) to zoom in so you can see what you're doing. Press Command - (PC: Ctrl -) to zoom back out.
Step 8: If you bring too much of the color back, just press X to swap color chips so that white is on top, and paint that area back out, as shown below:

Chances are, you'll do quite a bit of color chip swapping while tweaking the layer mask.
Here's the finished photo, with the layer mask circled in red:

Notice how the mask matches the butterfly? The beauty of zapping the color and then bringing it back with this technique is that we've not harmed a single pixel of the original image. If you or your client doesn't like the effect, just trash the adjustment layer and begin again. Toggle the visibility eyeball in the layers palette to see a before and after of your labors.
That's all for now! Until next time, may the creative force be with you all :)


PhotoLesa's photography gear provided by: