
PhotoLesa's photography gear provided by:


Sometimes it's tough to get a right proper blurry background in your photos if you don't have a digital SLR (interchangeable lens camera). Oh sure some of the point and shoot cameras have specialized shooting modes for this type of thing (namely portrait mode), but what if you forget and shoot in automatic? Are you doomed to be forever in focus? Negative. It's really easy to produce a beautifully blurry background in both Photoshop and Elements, and that's exactly what I'm going to show you today.
Though the following screen shots are in Elements, they're almost identical in the full blown version of Photoshop. We'll do it all on a photo I found by doing a search for "education" in the super vast iStockphoto database.
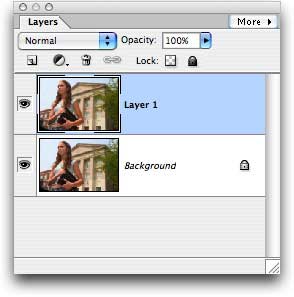
Step 1: Open the offending photo in Photoshop Elements. Immediately duplicate the background layer by pressing Command + J (PC: Ctrl + J).
Step 2: Hop up to the Filter menu and choose Blur > Gaussian Blur. You want to blur the image quite a bit, so pump up the amount to at least 3 or 4 pixels.
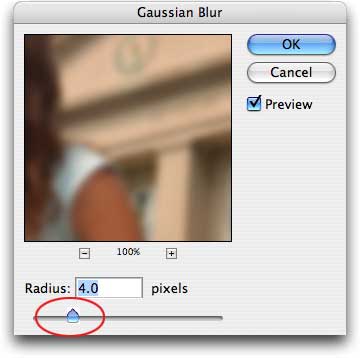
TIP: Click and hold within the preview window of the Gaussian Blur dialog box. This will toggle the before and after image for you. Click and hold within the same window and the cursor will turn into a little hand. You can use this to move around within the preview image.
You obviously don't want the whole image to be blurry so the next step is to hide the bits you want to be in focus. This is easily done with a layer mask, though, the good folks at Adobe will tell you that Elements doesn't support layer masks. Technically, it doesn't; however, there's a super easy workaround.
In Photoshop:
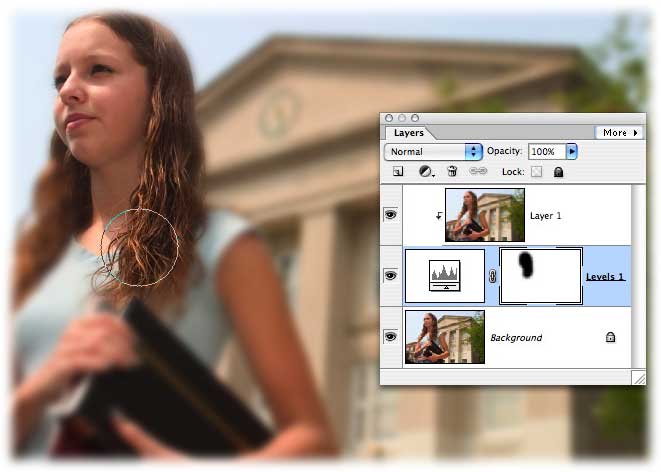
Step 3: With the blurry layer selected, click the circle within a square icon at the bottom of the Layers Palette. This will create a layer mask.
In Photoshop Elements:
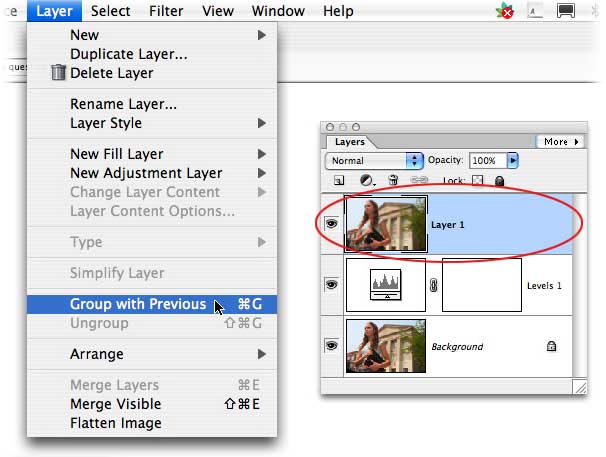
Step 4: Click the half black/half white circle at the top of the Layers Palette. Choose Levels and immediately click to send the Levels dialog away. We're using it simply for the layer mask that tags along with it, and that's it.

Step 5: Click and drag the adjustment layer so that it's between the background and blurry layers in your Layers Palette.

Step 6: With the blurry layer selected (it'll be light blue in the Layers Palette), choose Layers > Group with Previous. This groups the blurry layer with the adjustment layer, enabling us to use the layer mask.
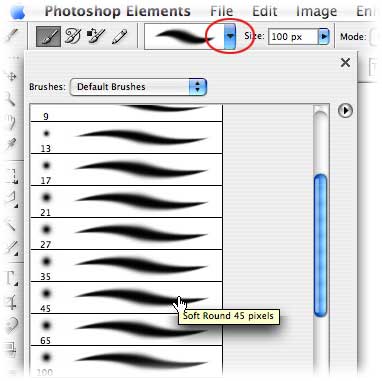
Step 7: Press B to select the Brush Tool, and from the options bar at the top of your screen, make sure you have a soft brush selected. Press D to set the color chips to the default of black and white, then press X until black hops on top.
Step 8: Click the layer mask to select it (a tiny hairline border will appear around it), then begin to paint onto the focal point of the image.
TIP: Press [ to cycle down in brush size, and press ] to cycle up. Start out with a large brush to paint the large areas then switch to a smaller brush and go around the edges. Press Command + (Ctrl +) to zoom in so you can better see what you're doing. Press and hold the Spacebar to move around within the image while you're zoomed in.
Step 9: If you happen to make a mistake and hide more of the blurry bits than you intended, just press X to swap color chips so that white is on top. Now, brush over those areas that you want to be blurry.
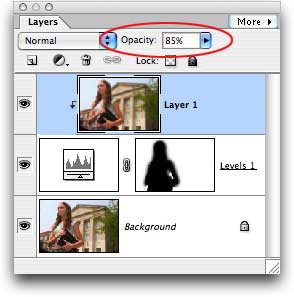
Step 10: If the blurry effect is a little too strong, lower the Opacity of that layer just a bit.
Here's our before and after:

Nice effect, eh? And it's a great way to put the focus on what's important: the subject matter. Until next week, happy background blurring!


PhotoLesa's photography gear provided by: