
PhotoLesa's photography gear provided by:


Sometimes it's the simplest stuff that proves most challenging.
Take drawing lines in Photoshop. Sounds easy enough, if Adobe hadn't buried the Line Tool (yes there is one). But what if you need a line with arrows? Did you know there's a tool for that too? Today I'll introduce you to Photoshop's hidden Line Tool and the secret to customizable arrows at either end. As a bonus, I'll show you how to draw those handy little red circles you see in some of my tutorial screen shots. As luck would have it, the steps are identical in Photoshop Elements.
I'll illustrate the effect on a photo I took a week or so ago in the swimming pool at the Golden Nugget Hotel and Casino in Las Vegas. Seriously. The designers plopped a big 'ole shark tank right in the middle of the pool. It's incredibly amazing. There's even a slide that goes right through the center of the tank, I kid you not. A video lives here (7.6 MB QuickTime movie).
Some of the most useful items somehow end up buried in Photoshop. I can't really blame Adobe though, I mean, with software that powerful with so many settings and options, it'd be tough to find a place to put everything within immediate sight.
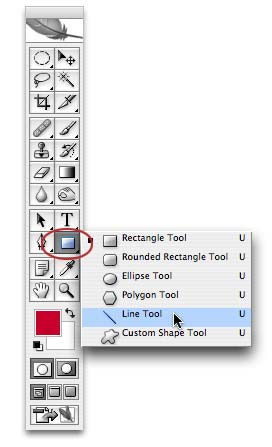
Step 1: The ever handy Line Tool lives within Vector Shapes in the main Toolbar. Just click the Vector Shape button and you'll see it pop out to the right, like so:
Step 2: Hop up to the Options toolbar at the top of your screen and click the shape layers button (circled at left below). Using a shape layer is going to allow us to rotate and resize our line if we'd like later on. TIP: The middle button will create a path (think outline) of a line, and the third button fills the line with pixels. Next, decide how thick you want the line to be. Type that pixel value into the weight box circled at right below.

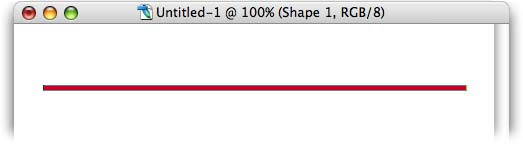
Step 3: Mouse over to your document, click and drag to draw the line. TIP: Hold the Shift key as you drag to lock it into being perfectly horizontal or vertical.
Step 4: The line color is picked up from your foreground color chip in the main Toolbox. However, you can change line color after drawing it by clicking the color well in the Options toolbar, circled below. NOTE: You must have the line layer selected in the Layers Palette for this to work.

Because the Line Tool is a vector shape and not actual pixels, you can resize it without losing quality.
Step 5: Select the line layer in the Layers Palette and press Command + T (PC: Ctrl + T) to summon Free Transform. Drag either the left or right handle inward or outward to resize it, again holding the Shift key if you want it to be perfectly straight. Press Return to accept the Transform. NOTE: You could also grab the top or bottom handle and drag those out to turn it into a rectangle.
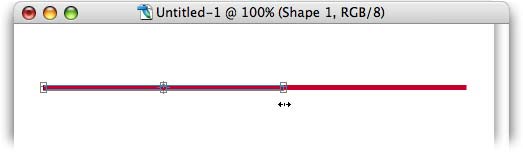
TIP: To resize both ends of the line at the same time, hold the Option (PC: Alt) key while dragging.
To draw a line with arrows at either end, you need to turn that option on before you draw the line; you can't do it afterward.
Step 1: Select the Line Tool and in the Options toolbar, click the downward facing triangle circled below to bring up the Arrowheads palette (who knew *that* was there?!).
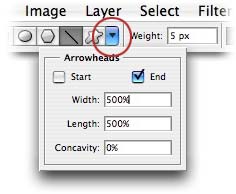
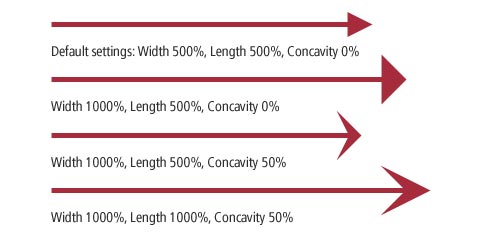
Step 2: In the resulting dialog box you must make some decisions. Do you want an arrow at one end or both? How wide do you want it to be? How long? Do you want the base of the arrow curved (conclave)? Below are some examples of lines with arrows at the end, along with the settings I used to create them:
So see? Drawing a plain old line is super simple in Photoshop, and it's even easy to draw one with arrows provided you know where to look for that option.
This one's really easy and you'll kick yourself for not thinking of it yourself.
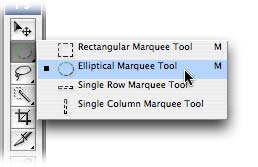
Step 1: Grab the Elliptical Marquee tool.
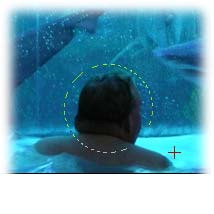
Step 2: Mouse over to the document and click and drag to draw an ellipse. TIP: Hold down the Shift key to constrain the tool to a perfect circle. Hold down the Space bar to move the ellipse around *as you draw it* (very handy). Last but not least, hold down the Option (PC: Alt) to draw the shape from the center outward.
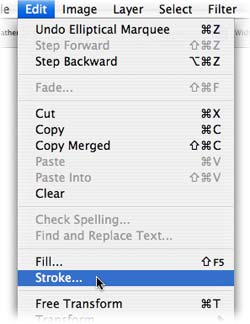
Step 3: Choose Edit > Stroke.
Step 4: Enter a size (I typically use 2 pixels just so the circle is thick enough to see), pick a color from the color well, and choose Center (circled below). Center means that one pixel will appear on the outside of the selection I drew, and one pixel will appear on the inside. The pixels straddle the selection in other words.
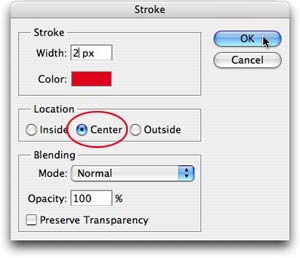
Press Return to send that dialog away. This is what we get:

So now, we have all the tools necesssary to create something like this:

I'm feeling compelled to say yikes.
Until next week, have fun doing lines and um, watch out for sharks ;)


PhotoLesa's photography gear provided by: