Let It Snow!
Mother Nature is a finicky creature and quite frankly, not to be trusted. When you want it to snow it will not, and when you don't there is sure to be a blizzard of epic proportions. Thankfully, Photoshop and Elements owners don't have to rely upon the weather for snowy photos. That's right, nestled snuggly in the Filter menu of both programs are two filters which can generate some of the most beautiful flakes you've ever seen. And thankfully, it takes all of five minutes to get it done. Plus, the steps are identical in both programs.
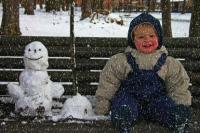
Let us begin with this wintery shot snatched from the gloriously diverse database at iStockphoto.com. It's a cute photo, though some well-placed flurries would make it even cuter.

Adding the flakes
Step 1: Open the photo and create a new layer by pressing the New Layer icon at the bottom of the Layers palette. NOTE: In Elements, this button lives at the top left of your Layers palette. NOTE: No need to double-click the Background layer to make it editable, as we won't be messing with the original image.

Step 2: Press D to set your color chips to the default of black and white, then press X until black hops on top.

Step 3: Choose Edit > Fill to fill the new layer with black. Immediately change the blending mode of the black layer to Screen, as shown below. We're doing this because the Screen blending mode lightens the underlying photo and ignores black. This will become important in the very next step.

Step 4: Trot up to the Filter menu and choose Sketch > Graphic Pen.

Step 6: In the resulting monstrous dialog box, change the Stroke Direction pop-up to Vertical. That's going to make the snow fall straight down. Think of Stroke Length as flake size, so lower it to around 5 for fairly small flakes. Light/Dark Balance is the heaviness of snowfall. Set it to a lower number for blizzard conditions, and to a higher number (like 95) for light snow. Press OK when finished.

For example, a high Stroke Length and low Light/Dark Balance will produce a right proper blizzard (which looks more like sleet to me):

However, by lowering the Stroke Length we get nice small flakes, and by increasing the Light/Dark Balance we have a light, visually pleasing snowfall which doesn't completely obscure the focal point:

Softening the flakes
Step 7: Last but not least, soften the flakes by choosing Filter > Blur > Gaussian Blur. Enter 1.5 for radius and press OK.

Here's the finished product:

Pretty darn nice, eh?! And quick. I really love quick. Plus, the beauty of creating the snow on its own layer is that you have Opacity control--if the effect is too strong, just lower it a bit. Likewise, if it looks terrible, you can trash the layer and start over.
Of course, there is much fun to be had adding snow to completely inappropriate photos, like this (heavy metal?) Buddha I shot at a monastery in upstate New York:

And I highly recommend adding snow to photos of completely unsuspecting victims (like the husband). I snatched this cute Santa hat illustration from iStockphoto.com too:

Until next time, happy snow-making!


