
PhotoLesa's photography gear provided by:


Sure it sounds straightforward enough, this whole business of using Save for Web in Photoshop to compress your beautiful artwork. No problemo, just JPEG that bad boy for all the Internet to see and you'll be set. But wait! In order to get a small file size you're going to have to sacrifice valuable pixel data resulting in quality loss. If you're not careful, your beloved art can get trashed in wretched ways during the compression process when Photoshop starts tossing out pixels here and there. Lucky for us, there's a workaround that still produces download-friendly images with the important bits intact.
In this tutorial, you will learn how to use an Alpha Channel to tell Photoshop where the important bits of your image are, thereby protecting them from the horrors of compression (also called downsampling). You'll also learn what selecting Progressive in the Save for Web dialog box really does.
Step 1: Open the soon-to-be compressed artwork or image. Now stare at it. What's the most important part? Slap a selection around that part with any of the various tools: the Marquee (to select by rectangle or oval shapes), Magic Wand (to select by color), or the various Lasso tools (to select by drawing an area out yourself).
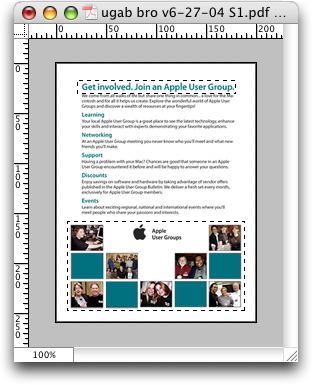
Example: I designed the brochure below for the Apple User Group Program last year, and I wanted to include it in my online portoflio. The thing is so big that I needed to compress it, well, to death. The important part of this piece is not the text, it's the layout and the images at the bottom. The text is way too small to read so I don't really care about the quality of that particular area, and I'm willing to sacrifice more quality loss there than anywhere else.
Step 2: Draw a selection around the aforementioned important bits. I used the rectangular Marquee selection tool on the bottom part, then held down the Shift key and drew another rectangular selection around the headline.
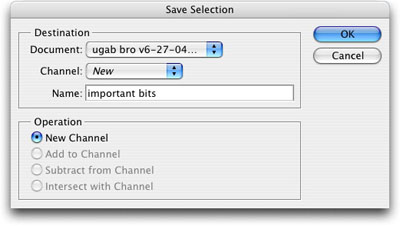
Step 3: Trot up to the Selection menu and choose Save Selection. In the following dialog box, give your selection a name you'll remember. I chose "important bits" :)
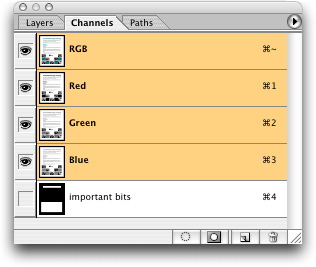
Now if you go over to the Layers Palette and click on the Channels tab, you should find a new Channel at the bottom (as shown below). NOTE: If you don't see the Channels tab in your Layers Palette, from the menu bar at the top of your screen select Window > Channels.
Step 4: Choose File > Save for Web. In the Preset area of this freaking *huge* dialog box, click the tiny mask icon on the far right (circled in red below). This is how we're going to tell Photoshop to use our Alpha Channel when it does its color reduction algorithm thang.
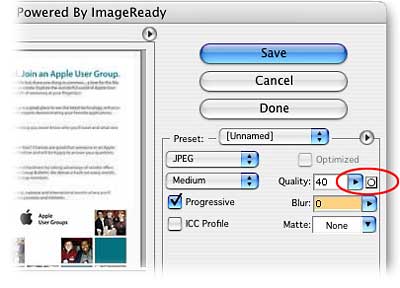
TIP: Checking the Progressive box above will cause your JPEG to load (build, rather) in a web browser little by little. If you leave this box unchecked, the JPEG will come in as a whole image, causing a slight delay as the entire image must download before the browser will display anything. Choosing Progressive will shave a hair or too off image download time, though it's really up to you and how you much of a control freak you are about how your images are displayed :)
Step 5: Next, choose the Channel you previously named in the pull-down menu. In our case, "important bits." Press OK and continue on.

Step 6: Back in the Save for Web dialog, you'll notice that the little mask icon we clicked on above has now darkened on that particular thumbnail. NOTE: Photoshop does not apply the Alpha Channel to any other preview thumbnails, only the one you had selected when you clicked on the mask icon originally.
Notice how the file size is a little smaller on the thumbnail using the Alpha Channel (top), than it is on the other one (bottom).
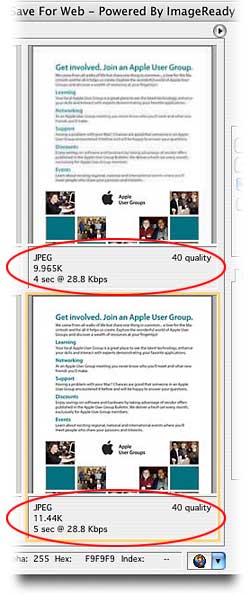
It's easy to see how this technique can shave valuable seconds off download time, especially in a digital portfolio. Though we shaved off merely a second in our example, time savings will vary depending upon the number of colors in your graphic, initial size, etc.
Until next time, happy shaving!


PhotoLesa's photography gear provided by: