
PhotoLesa's photography gear provided by:


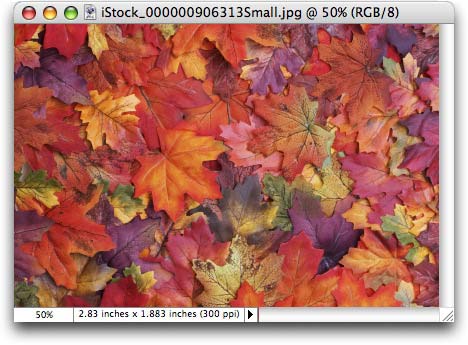
To commemorate the first day of Fall, I thought I'd take this gorgeous photo of colorful leaves (plucked from iStockphoto of course!) and show you how to easily create a fade from the photo's original color to grayscale. Sound interesting? Read on!
NOTE: You might not want to blink, because this technique is extremely fast to produce. This tutorial will be over in a flash. Also, though this tutorial is written in Photoshop Elements, the steps are nearly identical in Photoshop CS2.
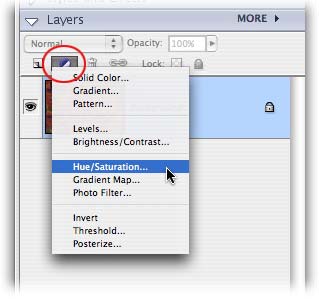
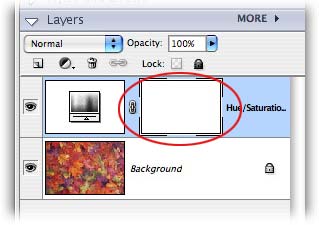
Step 1: Pop open a photo in Elements and create an adjustment layer by clicking the half black/half white circle in at the top of the Layers Palette. Choose Hue/Saturation, as shown below.
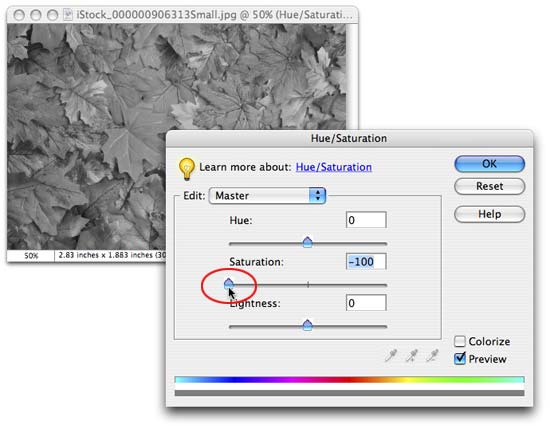
Step 2: In the resulting dialog, pull the Saturation slider all the way to the left and press OK. All color shall drain from the image.
Mask? What mask? When did we add a layer mask and furthermore, Elements doesn't support layer masks! When we created the adjustment layer, a layer mask tagged right along with it. This layer mask allows us to hide the effects of the adjustment layer by painting that area with black (in the realm of the layer mask, black hides and white reveals). In this case, we'll be hiding the act of de-saturating the image, thus bringing back some color wherever we paint with black.
Step 3: In the Layers Palette, locate the layer mask that tagged along with the Hue/Saturation adjustment layer. Click it once to select it, and you'll see a hairline border appear 'round it, like so:
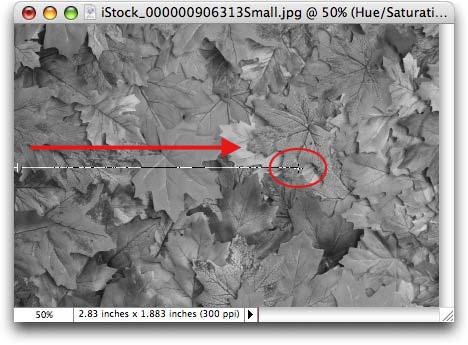
Step 4: Grab Ye Ole Gradient tool by pressing G, or by selecting it from the main Toolbox.

Step 5: Direct your attention to the Options bar at the top of your screen, and click the gradient pop-up menu (indicated by the red arrow shown below). Choose Black to White, then choose the Linear Gradient button (both circled in red below).
Poof! We're all done--I told you this technique was fast! This is what we have now:
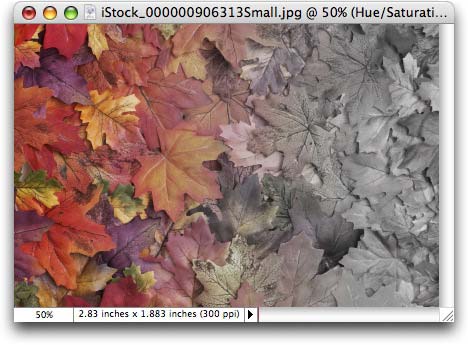
In the Realm of the Layer Mask, black hides and white reveals, so by choosing a black to white gradient, we in effect are hiding the Hue/Saturation adjustment layer, which in turn hides the acts of turning the photo into a grayscale where we paint with black. Whew. That was a mouthful.
And if you're non-plussed by your first Professional Gradient Dragging Attempt, just have another go at it. As long as you have the mask selected, you can continue dragging with the Gradient tool as long as you wish and you won't be harming the original image. Drag from the top to the bottom, bottom to top, corner to corner, whatever you wish! Depending upon the composition of the subject, different gradient angles may look better than others.
That's all for now folks! Until next time, happy color fading :)


PhotoLesa's photography gear provided by: