
PhotoLesa's photography gear provided by:


Note: This technique also works in Photoshop CC.
Declared one of the top web moments of the decade by The Webby Awards, the 140-character realm of Twitter is a phenomenon. It also happens to be a great place for shameless self-promotion, graphically speaking. In this tutorial you’ll learn how to create and upload a custom Twitter background.
The simplest route to customization is to change the color scheme and repeating background graphic (also called a tile). The upside is that there are several web-based applications that’ll do it for you, and the tiled background looks great on any monitor resolution, in any size browser window. One of the slickest apps is Themeleon. It's a terrific way to waste 30 minutes. However, to add any promotional info to your Twitter page, you must build a graphic big enough that it won’t tile. One method is to build a big honkin’ graphic that spans the width of a 30-inch display. Even though your page takes a hair longer to load, it’ll sure look cool. Another approach is to create a slim, left-hand sidebar that fades to a solid color. Just set your Twitter background color to match and visitors will see a nice graphic on the left and a color blend on the right no matter how big their browser window is, regardless of their monitor resolution. Read on to learn how!
Step 1: Gather some fun graphics. Companies such as iStockphoto are a great resource for decorative embellishments like scraps of paper, pushpins, post-it notes, etc. You’ll also need a headshot, logo, photography, and images of your product, book, etc. (For 10 free images, visit http://www.lesa.in/istockdeal.)
Step 2: Choose File > New and create a new document named “Twitter Template” that’s 1280 by 1024 pixels. Once it opens, drop a horizontal guide one inch from the top of your document to represent the area hogged by the Twitter logo. Just choose View > New Guide, pick Horizontal, and enter “1 in”. Press OK and you’ll see the new guide appear. Anything you place in this area may appear behind the Twitter logo if the visitor’s browser window is small.
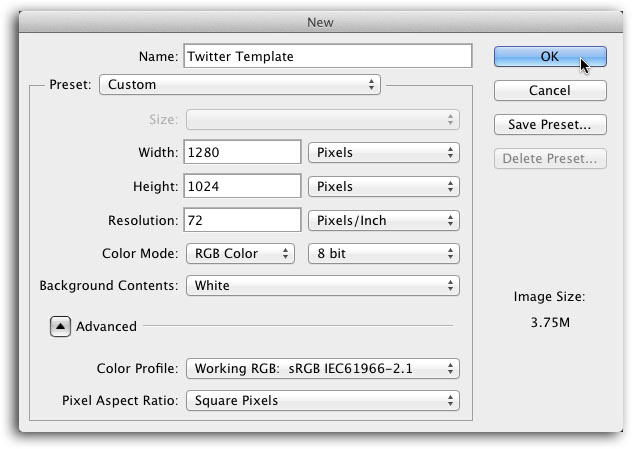
Step 3: Add a Solid Color Fill layer for your new background. Click the half black/half white circle at the bottom of your Layers panel (circled below) and choose Solid Color. In the resulting Color Picker, choose the color you want your sidebar graphic to blend into as it transitions to the right. To experiment with color later on, just double-click the Fill layer's thumbnail to reopen the Color Picker.

Step 4: Create a white box to represent the Twitter feed. This area is a fixed size and automatically centers itself within the visitor’s browser window, so it’s helpful to have for reference while designing. Press D to set your color chips to the default of black and white, and then press X until white becomes the foreground color. Click to activate the Rectangular tool from your Tools panel or press U (pressing Shift-U repeatedly to cycle through all the tools in that set). In Photoshop CS6 and CC, trot up to the Options bar and choose Shape from the drawing mode pop-up menu. Next, set the Stroke to none. In the width field, enter “10.625 in” and in the height field enter “8.125 in”. In CS5 and earlier, click the Shape mode button in the Options bar and then enter the measurements into the width and height fields as described here.

Step 5: To add the white box to your Photoshop document, click once along the guide at the top of your document and in the resulting Create Rectangle dialog box, click OK (your measurements appear in the box automatically since you typed them into the Options bar in the previous step). Press V to activate the Move tool and then drag the box to the center of your document (you can just eyeball it). Here’s what your document and Layers panel should look like now:

Step 6: Add your graphics. Choose File > Place to add your headshot and other graphical elements as Smart Objects (or copy/paste straight from Adobe Illustrator). Using Smart Objects is great way to experiment with the size of each element because Photoshop protects the original content by remembering its original dimensions and file format (so you can resize the art without losing quality). Next, add some text. Press T to grab the Type tool and type your name, company name, mantra, URL, and even your email address (this is a graphic so it can’t be snatched by spambots). Since you’ll be saving the Twitter graphic as a PNG, your text will remain nice and crisp. Save a master copy of your document for future editing by choosing File > Save As. Pick Photoshop from the Format or File Type pop-up menu in the resulting Save dialog box and click OK.
Step 7: Turn off the visibility of the white box layer and then crop the image to the graphics’ edge. Press C to grab the Crop tool and either draw a box around your art or use the automatic crop box in CS6 and drag its handles inward to the edges of your art. Press Return (Enter) to accept. Alternatively, you can choose Image > Trim and in the resulting dialog, pick Bottom Right Pixel Color, and then press OK.

Step 8: Jot down the hex value for your background color. Since you’ll need to set your Twitter background color to the exact same value, double-click the Solid Color Fill layer thumbnail to open the Color Picker and copy the hex value so you can enter it into Twitter in step 11. While you’re at it, pick out new colors from your new snazzy graphics for your links, right-hand sidebar, and right-hand sidebar border — click your foreground color chip to open the Color Picker and then click any color in your document to see its hex value.

Step 9: Export a PNG for Twitter. Turn off the visibility eye of the layer containing the white Twitter feed box, choose File > Save for Web, and click the 4-Up tab near the top of the gigantic resulting dialog. Pick PNG-8 from the format pop-up menu over at the top right, and see how your graphics look. If they look terrible, increase the Colors numeric quality setting until they look good. Press OK to exit the dialog and save your image. (TIP: If you didn’t add text or vector graphics, feel free to use a JPEG instead as it’ll create a slightly smaller file size.)

Step 10: Upload your new graphic to Twitter and change your page colors. The Twitter interface changes every so often, but the basic gist is to log into your Twitter account, click the white “bust” near the top right (which represents your account or avatar) and then click Settings. On the resulting page, click Design in the navigation bar on the left. Scroll past the thumbnails and in the “Customize your own” section, click “Choose File” and navigate to where your new sidebar graphic lives on your hard drive. Turn off “tile background” checkbox. Click within the Background and Links fields and paste the hex value you captured earlier. Last but not least, click the “Save changes” button. (Again, these steps may change but just cruise around the Twitter interface until you see similar options.)

Here’s the final result:
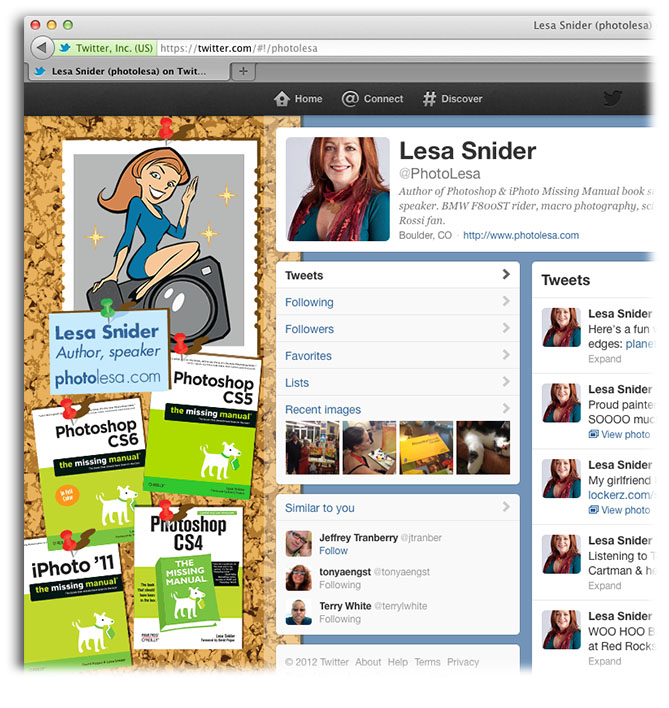
As you can see, building your own sidebar graphic is a lot of fun, and it’s a great way to show a little personality. Just sit back and wait for those “WOW I can’t believe you’re so creative!” direct messages to roll in. Until next time, may the creative force be with you all.


PhotoLesa's photography gear provided by: