Aging Photos
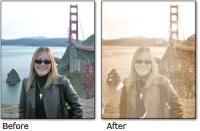
Thanks to a reader's email, I thought we'd embark on a little journey to the past. In this week's tutorial, I'm going to show you a multitude of ways you can use Photoshop to completely destroy a photo, making it look like it was taken 50 years ago.
NOTE: A Texas-sized thank you to Marcus Conge for helping me with this tutorial!
Tip #1: Make it a sepia tone
Sounds cryptic but sepia is defined as, “shades of brown found in pictures from very early photography.” Furthermore, “inky” secretions from a cuttlefish actually produce this coloration. Fascinating! Anyway, this quick color effect makes a big difference, and to me, can really bring out a sultry or aged feel to an image (and thankfully, there’s no fish squishing involved).
My favorite method of creating a sepia tone is:
Step 1: With your image open and the background layer editable, choose Image > Adjustments > Desaturate (Mac: Shift + Command + U, PC: Shift + Control + U).

Notice that the color has disappeared from the image, though, the document mode is still RGB. This is important since we’re going to add color back in to make it a sepia tone.
Step 2: Next, click on your topmost color chip in the toolbar and pick the color you want to use. For sepias, we want some shade of brown (which now I will forever link to fish bits--eww). NOTE: this technique will work with any color, so experiment away.
Step 3: Create a new layer and fill it with this color. Make sure the new layer is on *top* of the image layer. TIP: To quickly fill a layer with color, just press Option + Delete (PC: Alt + Delete).
Step 4: Change the blending mode of the new layer to Color, as shown below, and watch your image reappear in shades of brown.

So this is what we have now:

Tip #2: Add some homemade streaks with built-in filters
Step 1: Create a new layer and place it above the sepia layer.
Step 2: With your topmost colorchip still set to the brown you used to create the sepia layer above in Step 3, set the bottom chip to white. Just click once on the chip and choose white in the resulting dialog.
Step 3: Make sure the new layer is selected in the Layers Palette, and from the Filter menu, choose Render > Clouds. You'll see some nice brownish-white clouds appear in your document.
Step 4: Hop back up to the Filter menu and choose Blur > Motion Blur. Enter 90 in the Angle box and push the Distance slider all the way right. This is going to make the clouds look like vertical streaks. Click OK.

Step 5: Back in the Layers Palette, change the Blending Mode of the cloud layer to Hard Light. Pull the Opacity slider down if your image becomes too faded out. This is how my Layers Palette looks now:

Now we're starting to get an old, faded look (below), which may be enough for you. If not, keep reading.

Tip #3: Apply texture with a couple of free downloadable brushes
There are oodles and gobs of free brushes, actions, etc. available to Adobe users on this site (registration required). Yes they're completely free. Yes they're amazingly cool and super handy. For our purposes, download Paper Damage and the Decay brush from the Adobe Studio Exchange site. Follow the directions onscreen to install and load them into Photoshop, then read on.
What we're going to do is create a new layer for each brush we use, so that each level of "destruction" will live on its own layer. That way you can toggle them off and on to your liking.
Step 1: Create a new layer, and place it on the top of the layers stack. Back in the toolbar, make your top colorchip white (that's the color we're going to paint the destruction with).
Step 2: Select the brush tool by clicking the pop-up menu at the top of your screen (circled in red below) and navigate to the first destruct-o-brush of your choice. I'm going to use the torn corner (shown below) of the Paper Damage set. Make sure to resize the brush accordingly (also circled in red below).
NOTE: I've noticed that most of the brushes in these sets were designed to be used at a size which covers your image. You'll see what I mean when you pick one and mouse back over your document.

Step 3: Make sure the new layer is selected, and click *once* in a corner of the document to apply the brush. This particular brush is best suited for the bottom left. The brush itself takes on the shape of the tear, as you can see below:

Step 4: Time for a new layer and a new destruct-o-brush. Create another new layer on the top of your stack. Hop up to the brush pop-up menu at the top of your screen and pick one from the Decay brush set.

Step 5: Mouse back over your image and click once to apply the brush. See how the brush covers almost the entire image below and even extends beyond the bounds of our image?

As you can see below, these three quick techniques made a huge difference. I'm going to stop there on this particular image, though keep reading for even more tips :)

Tip #4 Apply a careless cup stain on top
Just for fun, go a step farther and do a Google image search on cup stain (or just "stain") and download one. NOTE: Don't steal the image. Either make sure it's free or purchase it legally.
Toss the stain in on a new layer, at the top of your layers stack. NOTE: If your image is smaller than the stain, paste the stain in on a white layer. That way it will blend better. Change the blending mode of the stain to something like Hard Light or Pin Light (CS2 only), and position it wherever you like.
Tip #5 Create your own textures
I won't go into super detail on this one (fodder for another tutorial), but you can create great textures on your own by photographing outside elements like tree leaves, limbs, rocks, grass or even stark architectural elements (like a bridge). The effect would be similar to the aging brushes we applied ealier.
That's all for now! Until next time, have fun destroying your images.
That's all for now! Until next time, have fun destroying your images.


